
How to Connect Web 2.0 WordPress Websites with Google Search Console and Google Analytics
Author: Varun Kumar – Results-Driven SEO Strategist
Web 2.0 websites are commonly used for content publishing, building an online presence, and supporting off-page SEO strategies. Platforms such as WordPress.com allow users to create blogs and publish content without managing a separate hosting environment. However, publishing content alone does not tell you whether your website is receiving organic traffic or appearing in Google search results.
Connecting your Web 2.0 WordPress websites with Google Search Console and Google Analytics helps you monitor search visibility, indexing status, visitor activity, and website performance. These tools provide useful information about how people reach your content and how they interact with your website.
Whether you manage one WordPress blog or multiple Web 2.0 properties for off-page SEO, setting up these tracking tools alongside effective SEO Services can help you make better decisions, monitor website performance, and measure your SEO progress.
Why Should You Connect Web 2.0 Websites to Google Search Console and Analytics?
Before starting the setup, it is important to understand what each tool does.
Google Search Console (GSC) monitors your website’s presence in Google Search. It provides information about search queries, clicks, impressions, indexing, and technical issues.
Google Analytics 4 (GA4) measures website visitors and their interactions. It helps you understand where visitors come from, which pages they visit, and how they engage with your content.
Here are some important benefits:
- Monitor indexing: Check whether Google has indexed your Web 2.0 pages.
- Track keyword performance: Review the search queries generating impressions and clicks.
- Measure organic traffic: Understand how many visitors arrive through search engines.
- Identify technical issues: Check indexing and website performance reports.
- Measure engagement: Understand how visitors interact with your published content.
- Compare performance: Monitor changes in traffic and search visibility over time.
How to Connect a Web 2.0 WordPress Website to Google Search Console
Google Search Console is a free tool that helps website owners understand how their websites perform in Google Search.
Follow these steps to connect your WordPress website.
Step 1: Open Google Search Console
Visit https://search.google.com/search-console/ and sign in using your Google account.
Click the property selector in the top-left corner and select Add Property.
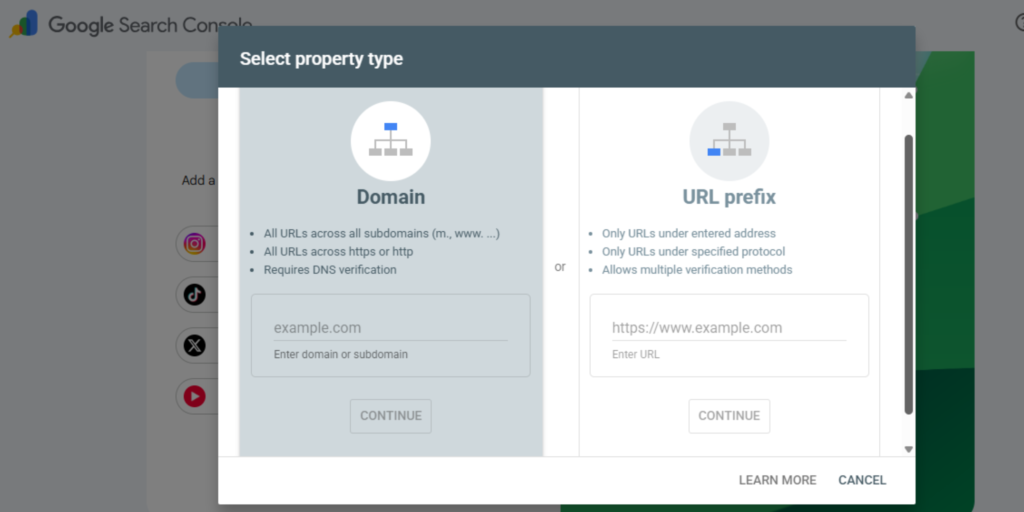
Google provides two property options:
- Domain
- URL Prefix
For a WordPress.com subdomain, such as yourblog.wordpress.com, select URL Prefix.
Step 2: Enter Your Web 2.0 Website URL
Copy your complete website URL and paste it into the URL Prefix field.
For example:
https://yourblog.wordpress.com/
Make sure you use the correct protocol and website address. If your website uses HTTPS, enter the HTTPS version.
Click Continue to proceed.
Step 3: Verify Website Ownership
Google needs to confirm that you own or control the website before providing access to its search performance information.
One available verification method is HTML tag verification.
Google provides a meta tag similar to this:
<meta name=”google-site-verification” content=”YOUR_VERIFICATION_CODE” />
Copy the complete verification tag.
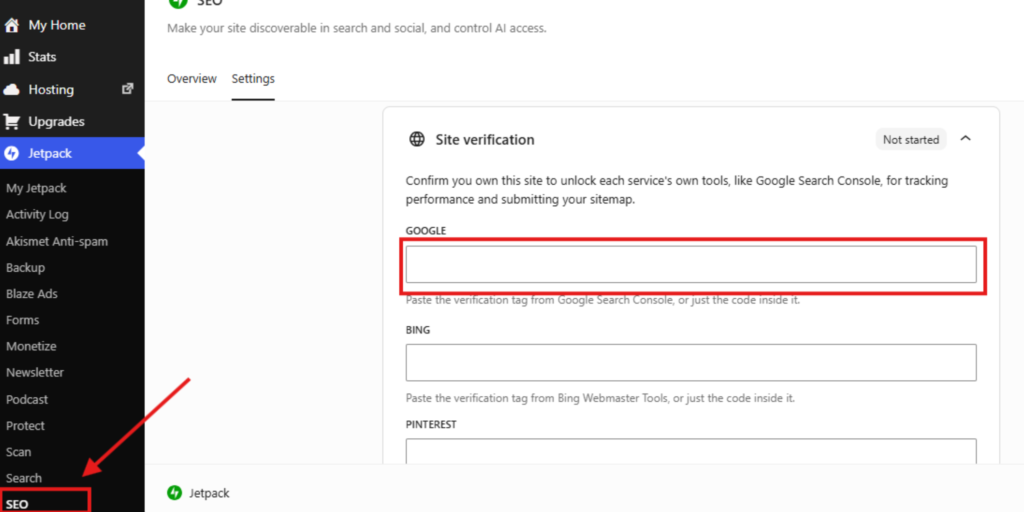
For WordPress.com websites, check the following location:
- Open your WordPress dashboard.
- Navigate to Jetpack → SEO.
- Open Settings.
- Expand Site Verification.
- Locate the Google verification field.
- Paste your verification code and save the settings.
- Return to Google Search Console.
- Click Verify.
The exact menu availability can depend on your WordPress.com setup. Alternatively, use DNS verification if you control the domain’s DNS records.
Step 4: Confirm Search Console Connection
After successful verification, Google Search Console will display your website property.
You can now access reports such as:
- Performance
- Pages
- Sitemaps
- Core Web Vitals
- HTTPS
Keep in mind that verification does not automatically mean every website page is indexed. Google still needs to crawl and evaluate your content.
How to Connect a Web 2.0 WordPress Website to Google Analytics 4
Google Analytics 4 helps you understand visitor activity and website engagement.
Follow these instructions to set up GA4.
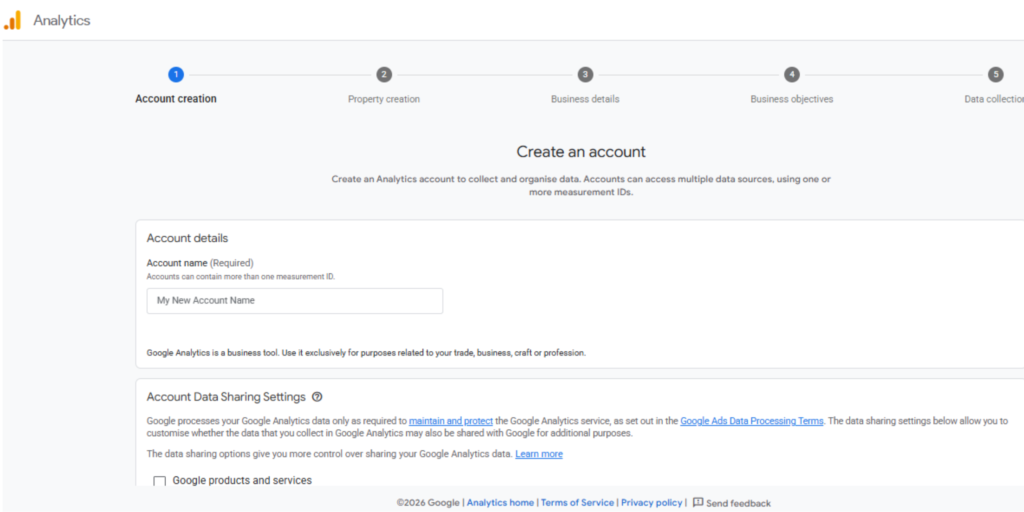
Step 1: Create a Google Analytics Account
Visit https://analytics.google.com/ and sign in using your Google account.
If you do not have an Analytics account, click Start Measuring.
Enter your account name and complete the account setup process.
Step 2: Create a GA4 Property
Create a new property for your Web 2.0 website.
Enter the following details:
- Property name: Your website name
- Reporting time zone: Your preferred reporting time zone
- Currency: Your preferred reporting currency
Complete the setup and choose Web as your data collection platform.
Step 3: Create a Web Data Stream
Enter your complete WordPress website URL.
For example:
https://yourblog.wordpress.com/
Add a stream name, such as Web 2.0 WordPress Blog.
Click Create Stream.
Google Analytics will generate a Measurement ID that looks similar to:
G-XXXXXXXXXX
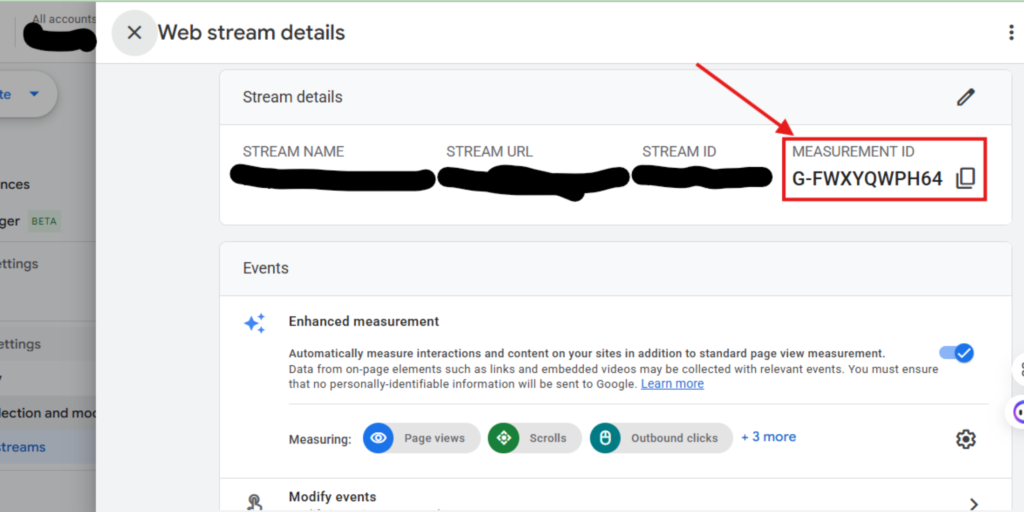
Copy this ID because you will need it to connect your website.
Step 4: Add Google Analytics to WordPress
The installation method depends on your WordPress platform.
For self-hosted WordPress.org websites:
Google Site Kit is one of the easiest options.
- Open your WordPress dashboard.
- Navigate to Plugins → Add New Plugin.
- Search for Google Site Kit.
- Install and activate the plugin.
- Click Start Setup.
- Sign in using your Google account.
- Complete the website verification process.
- Connect Google Search Console.
- Connect Google Analytics.
- Select the correct GA4 account, property, and web data stream.
Site Kit can connect both Google services without requiring you to manually insert tracking code.
For WordPress.com websites:
WordPress.com provides a Google Analytics integration through its supported settings. Navigate to Jetpack → Traffic and locate the Google Analytics section, where available.
You can enter your GA4 Measurement ID to connect the tracking service.
Important: WordPress.com’s official documentation currently lists Google Analytics integration for Premium, Business, and Commerce plans. Free and Personal plans do not include this integration. Check your plan before attempting installation.
How to Submit Your Web 2.0 Sitemap to Google Search Console
After connecting Search Console, submit your sitemap to help Google understand your website’s URL structure.
A sitemap contains information about the pages you want search engines to discover.
For many WordPress websites, the sitemap URL follows this format:
https://yourblog.wordpress.com/sitemap.xml
Follow these steps:
- Open Google Search Console.
- Select your Web 2.0 property.
- Navigate to Indexing → Sitemaps.
- Enter your sitemap URL.
- Click Submit.
- Check the sitemap submission status.
If the status shows Success, Google has successfully processed the sitemap submission.
However, sitemap submission does not guarantee indexing. Google determines which pages to crawl and index based on its own systems.
How to Check Website Traffic and Performance
After connecting both tools, start monitoring their reports.
Google Search Console Reports
Use the Performance report to monitor:
- Total clicks
- Total impressions
- Average CTR
- Average position
- Search queries
- Top-performing pages
The Pages report helps you understand which URLs are indexed and which have indexing issues.
Google Analytics 4 Reports
Use GA4 to monitor:
- Total users
- Sessions
- Organic Search traffic
- Engagement rate
- Average engagement time
- Landing pages
- Traffic acquisition channels
You can access these reports from the GA4 dashboard or through the Site Kit interface when connected.
Remember that Search Console and Analytics measure different activities. Their traffic numbers will not always match exactly.
Common Problems When Connecting Web 2.0 WordPress Websites
Sometimes, users experience problems during setup. Here are common issues and their solutions.
1. Google Search Console Verification Failed
This can happen if the verification tag is incomplete, incorrect, or not saved properly.
Solution: Copy the complete verification code again, check the WordPress verification settings, and retry verification.
2. Google Analytics Is Not Showing Data
GA4 may not immediately display reports after installation.
Solution: Check whether the correct Measurement ID is installed and visit your website to test the Realtime report. Also check for tracking blockers or duplicate tags.
3. Sitemap Submission Failed
An incorrect sitemap URL or a private website can cause submission errors.
Solution: Open the sitemap URL in your browser and check that it loads correctly. Confirm that your website is public before resubmitting it.
4. Website Pages Are Not Indexed
Submitting a sitemap does not automatically index every page.
Solution: Use URL Inspection in Search Console to check individual pages. Review crawling issues, content quality, internal links, and indexing eligibility.
Best Practices for Managing Multiple Web 2.0 Websites
If you manage several Web 2.0 WordPress blogs for off-page SEO, maintaining proper tracking is important.
Follow these practices:
- Create a separate Search Console property for every website.
- Use separate GA4 properties or clearly separated data streams for individual websites.
- Keep a spreadsheet containing website URLs, verification status, GA4 Measurement IDs, and sitemap URLs.
- Publish original, useful, and relevant content.
- Check indexing and search performance regularly.
- Avoid publishing duplicate articles across multiple Web 2.0 properties.
- Maintain natural and relevant internal and external links.
- Keep tracking codes correctly configured.
- Monitor organic traffic and engagement rather than relying only on published backlinks.
A structured tracking process makes it easier to identify which websites are receiving search visibility and which need further SEO improvements.
Frequently Asked Questions
Yes. You can verify a public WordPress.com free website using supported verification methods, including the HTML tag verification field available through Jetpack SEO. The exact options may vary by platform setup.
Yes. You can add and manage multiple website properties using the same Google account, provided you have the necessary ownership verification for each property.
Yes. Google Site Kit is a free official WordPress plugin. It helps connect Google services such as Search Console and Analytics to eligible self-hosted WordPress websites.
Realtime reports can show activity shortly after tracking is installed and working. Other reports may take approximately 24–48 hours to populate.
No. Connecting Search Console and submitting a sitemap help Google understand and process your website, but neither action guarantees indexing or improved search rankings.
Conclusion
Connecting Web 2.0 WordPress websites with Google Search Console and Google Analytics is an important part of measuring your off-page SEO activity. Search Console provides information about indexing, search queries, impressions, and clicks, while GA4 helps you understand website visitors and their engagement.
Whether you manage one blog or several Web 2.0 properties, setting up the correct tracking systems allows you to measure performance, identify problems, and make informed SEO decisions.
Start by verifying your WordPress website, connecting GA4 where your platform supports it, and submitting your sitemap. Review the reports regularly to understand how your content performs in Google Search.
Take control of your Web 2.0 SEO performance by connecting the right tracking tools and monitoring your results consistently. If you need professional SEO Services to improve your website’s visibility, rankings, and organic traffic, partner with SEO Yodha. Contact SEO Yodha today to build an effective SEO strategy for your business.
- By Varun Kumar